Authentication protocols are always quite interesting, as they are often surrounded by a mystic allure because most developers don’t care to spend sufficient time to get to understand them.
This is a bit of a shame, because when you read the documentation for the protocols you are often rewarded with insights into good software engineering practices and how more modern authentication protocols are improvements to past mistakes.
Today’s challenge was working with NTLM authentication used to secure an ODATA API in a older system. It has been quite a few years since a last had to deal with NTLM, mostly because I haven’t done any on-prem work and because the last year of my on-prem work was generally filled with Kerberos because customers wanted to avoid NTLM.
My intial impression of the API I was working with was that it used Basic Auth, which was great as I had to integrate with it from Azure API Management (which to my surprise doesn’t support NTLM). However when I first attempted to connect to the backend API from API Management, I quickly realized that my inital assumption of it using Basic authentication was wrong, as it simply didn’t work.
I turned to curl to figure out how to do the authentication manually.
curl https://api.domain.com --verbose From the response headers,
HTTP/1.1 401 Unauthorized
< Content-Type: text/html
< Server: Microsoft-IIS/10.0
< WWW-Authenticate: Negotiate
< WWW-Authenticate: NTLM
< WWW-Authenticate: Basic realm="************"
< X-Powered-By: ASP.NET
< Date: Mon, 11 Dec 2023 21:29:09 GMT
< Content-Length: 1293
it became obvious that NTLM was enabled, but Basic authentication also seemed to be possible. However I wasn’t able to get it working regardless of how much I tried.
NTLM authenication worked fine when I used
curl --ntlm --negotiate -u username:mypassword https://api.domain.com -verboseAfter that result I started wondering, why is NTLM not supported in Azure API management, and I thought maybe I can just implement it in a custom policy. I have done custom policies before for nonstandard OAuth2 implementations before without too much trouble.
So I started to look at the NTLM protocol implementation, by reading https://curl.se/rfc/ntlm.html - and quickly realized that maybe there’s a reason that no-one have done it before. I would have to do an multi-step auth dance with bit handling logic inside the XML policy definition, doesn’t exactly sound prodoctive or worthwhile.
While researching the spec I also became aware of the security issues revolving around NTLM, especially NTLMv1 (not that NTLMv2 is much better). And I wanted to see which specific version this API was using, however to my surprise that wasn’t as easy as I thought it could be.
The way I eventually figured it was to use curl to inspect WWW-Authenticate: Negotiate headers of the challenge response dance consisting of
- NEGOTIATE_MESSAGE (type 1)
- CHALLENGE_MESSAGE (type 2)
- NEGOTIATE_MESSAGE (type 3)
The value of the header WWW-Authenticate: Negotiate can be decoded, I found this tool to do the job https://github.com/jlguenego/ntlm-parser/tree/master
Here’s a screenshot of the process (sorry that I didn’t decode them in the right order)
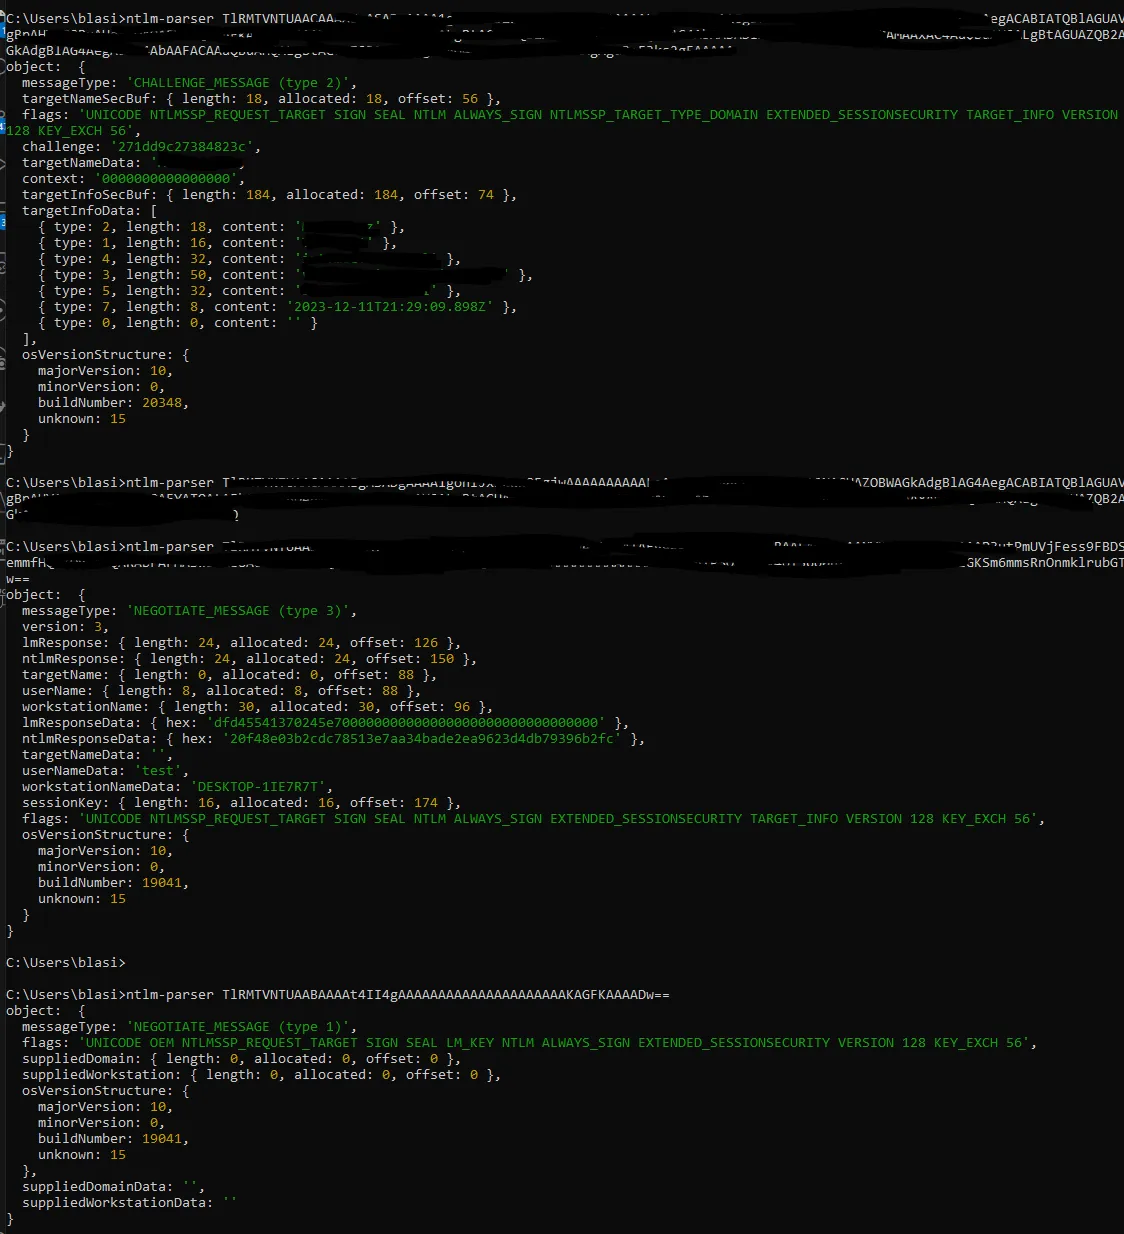
The interesting information is in the CHALLENGE_MESSAGE (type 2) package coming from the server, when that is decoded we get a bunch of different flags that identify what the server are capable of and how the client should prepare the NEGOTIATE_MESSAGE (type 3) response.
The flag that indicates if NTLMv2 should be used are EXTENDED_SESSIONSECURITY from the name that might not be so obvious, but I checked the mapping used for the flags in the ntlm-parser tool against that CURL uses.
export const ntlmFlags: Flag[] = [
  {label: 'NTLMSSP_NEGOTIATE_UNICODE', value: 0x1}, // A
  {label: 'NTLMSSP_NEGOTIATE_OEM', value: 0x2}, // B
  {label: 'NTLMSSP_REQUEST_TARGET', value: 0x4}, // C
  {label: 'R10', value: 0x8}, // r10 (0)

  {label: 'NTLMSSP_NEGOTIATE_SIGN', value: 0x10}, // D
  {label: 'NTLMSSP_NEGOTIATE_SEAL', value: 0x20}, // E
  {label: 'NTLMSSP_NEGOTIATE_DATAGRAM', value: 0x40}, // F
  {label: 'NTLMSSP_NEGOTIATE_LM_KEY', value: 0x80}, // G
  {label: 'R9', value: 0x100}, // r9 (0)
  {label: 'NTLMSSP_NEGOTIATE_NTLM', value: 0x200}, // H
  {label: 'R8', value: 0x400}, // r8 (0)
  {label: 'ANONYMOUS_J', value: 0x800}, // J
  {label: 'NTLMSSP_NEGOTIATE_OEM_DOMAIN_SUPPLIED', value: 0x1000}, // K
  {label: 'NTLMSSP_NEGOTIATE_OEM_WORKSTATION_SUPPLIED', value: 0x2000}, // L
  {label: 'R7', value: 0x4000}, // r7 (0)
  {label: 'NTLMSSP_NEGOTIATE_ALWAYS_SIGN', value: 0x8000}, // M
  {label: 'NTLMSSP_TARGET_TYPE_DOMAIN', value: 0x10000}, // N
  {label: 'NTLMSSP_TARGET_TYPE_SERVER', value: 0x20000}, // O
  {label: 'R6', value: 0x40000}, // r6 (0)
  {label: 'NTLMSSP_NEGOTIATE_EXTENDED_SESSIONSECURITY', value: 0x80000}, // P
  {label: 'NTLMSSP_NEGOTIATE_IDENTIFY', value: 0x100000}, // Q
  {label: 'R5', value: 0x200000}, // r5 (0)
  {label: 'NTLMSSP_REQUEST_NON_NT_SESSION_KEY', value: 0x400000}, // R
  {label: 'NTLMSSP_NEGOTIATE_TARGET_INFO', value: 0x800000}, // S
  {label: 'R4', value: 0x1000000}, // r4 (0)
  {label: 'NTLMSSP_NEGOTIATE_VERSION', value: 0x2000000}, // T
  {label: 'R3', value: 0x4000000}, // r3 (0)
  {label: 'R2', value: 0x8000000}, // r2 (0)
  {label: 'R1', value: 0x10000000}, // r1 (0)
  {label: 'NTLMSSP_NEGOTIATE_128', value: 0x20000000}, // U
  {label: 'NTLMSSP_NEGOTIATE_KEY_EXCH', value: 0x40000000}, // V
  {label: 'NTLMSSP_NEGOTIATE_56', value: 0x80000000}, // W
];
source: https://github.com/jlguenego/ntlm-parser/blob/master/src/ntlm/flags.ts
In curl the flags are defined in https://github.com/curl/curl/blob/master/lib/vauth/ntlm.h#L106
#define NTLMFLAG_NEGOTIATE_NTLM2_KEY             (1<<19)
/* Indicates that the NTLM2 signing and sealing scheme should be used for
   protecting authenticated communications. */
And yes 1<19 is the same as 0x80000
In curl the statement that defines if NTLMv2 should be used are found on: https://github.com/curl/curl/blob/master/lib/vauth/ntlm.c#L534C3-L534C51
So that is one way to figure out which version of NTLM that a server support and which version curl uses.