This is not the first time I promote the Web Job feature of Azure Web Sites, but they recently added some new features that I feel a lot of people haven’t noticed yet, so I in this post I show how they make working with Web Jobs even better.
Updated on 28th of July 2014, to reflect the 0.3.0-beta release of the web job nuget packages Microsoft.Azure.Jobs.
If you are using version 0.4.0-beta or newer then please consult: This article
When building applications for the cloud it is generally a good idea to use the Publish-Subscriber pattern, by doing so you can disconnect the front-end from the backend which enables you to scale-out your architecture with multiple backends or frontend depending on where your load is. The easiest way to implement the pattern is by using Azure queues in between your frontend and backend tier.
Traditionally working with Queues in Azure Web Sites and connecting them with a Azure Web Job, has been a manual task. But with release of the Nuget package Microsoft.WindowsAzure.Jobs and Jobs.Host this task has been made a lot easier.
For the purpose of demonstrating this, I have created a WebAPI project called MessageAPE (should have been MessageAPI, but I typed it wrong and decided to the go with the slightly more funky name).
The application contains a message REST endpoint, that posts messages to a Queue. Then I have a Console Application, MessageSender, installed as a web job taking the role of the backend that reads from the Queue and sends the message with the desired means of transportation SMS or Email (In this post it just logs to the Console).
First create a new VS project.

When the project is created add a new Console Application to it that will serve as a our Web Job. In order to get access to the new features for web jobs, we have to install the following nuget package, in the package manager console write:
Install-Package microsoft.windowsazure.jobs.host -pre
An alternative to doing it this way, is to install the SideWaffle extensions that also comes with a project template for a Azure WebJob Application.
The code we need to write the console application that is going to our Web Job is very minimal. Take a look:
[csharp]
using System;
using Microsoft.WindowsAzure.Jobs;
using MessageAPE.Model;
namespace MessageSender
{
class Program
{
static void Main(string[] args)
{
JobHost host = new JobHost();
host.RunAndBlock();
}
public static void ProcessMessage([QueueTrigger("textmessages")] TextMessage message)
{
Console.WriteLine("Message type: {0}, recipient: {1}, message: {2}", message.Type, message.Recipient, message.Text);
}
}
}
[/csharp]
Here I create a new JobHost and tells it to never exit, if my application crashes it is a good thing to deploy the web job as continues, so it will automatically start again. It will be forever listening to incomming messages on the queue, “textmessages” that I have specified as the parameter of the QueueTrigger attribute. If I use strongly typed my input parameters the WebJob framework will automatically deserialize the message from the queue, using JSON.net.
To easily add the console application to the deployment as a Web Job, I recommend that you install this extension to Visual Studio WebJobVs. Once it’s installed you can right click the web application project, select add Windows Azure WebJob. Then the extension will added some msbuild files to your project that will ensure that the console project is added to the app_data catalog when you publish the web project from Visual Studio. This is a nice one-click-deployment.
A few things need to be taken care of before you can publish your project to Microsoft Azure.
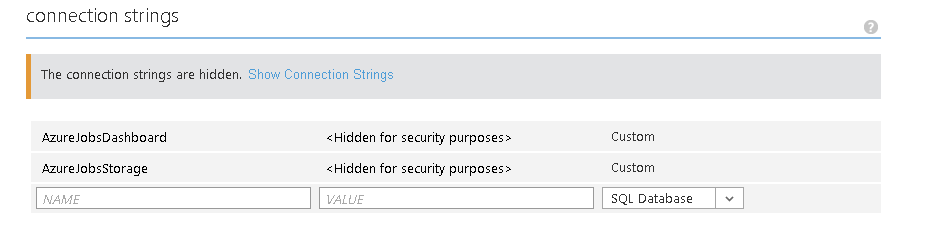
- You need to create a storage account to use
- You need to setup an connection string code>AzureJobsStorage with your storage connection string in the configuration tab of you azure website, the queue should be located in this storage account.
- You chould add a connection string
AzureJobsDashboardthis is where diagnostics logs will be placed, the value can be the same asAzureJobData
The WebAPI controller that adds messages to the queue can be made very simple, mine looks like this (note this is not production ready code). The thing to remember is that if you use strongly typed classes for the input parameters in your WebJob, then you have to serialize you queue message JSON.net before you add it to the queue. Here’s what my MessageController looks like.
[csharp]
using System.Web.Http;
using MessageAPE.Model;
using Microsoft.WindowsAzure;
using Microsoft.WindowsAzure.Storage;
using Microsoft.WindowsAzure.Storage.Queue;
using Newtonsoft.Json;
namespace MessageAPE.Controllers
{
public class MessageController : ApiController
{
[HttpPost]
public void Send(TextMessage message)
{
CloudStorageAccount storageAccount = CloudStorageAccount.Parse(CloudConfigurationManager.GetSetting("StorageConnectionString"));
// Create the queue client.
CloudQueueClient queueClient = storageAccount.CreateCloudQueueClient();
// Retrieve a reference to a queue.
CloudQueue queue = queueClient.GetQueueReference("textmessages");
// Create the queue if it doesn’t already exist.
queue.CreateIfNotExists();
// Create a message and add it to the queue.
CloudQueueMessage queueMessage = new CloudQueueMessage(JsonConvert.SerializeObject(message));
queue.AddMessage(queueMessage);
}
}
}
[/csharp]
Now I can post messages to this end point and they will get picked up by my WebJob and in between sites a queue that will allow for great scaling of my architecture.
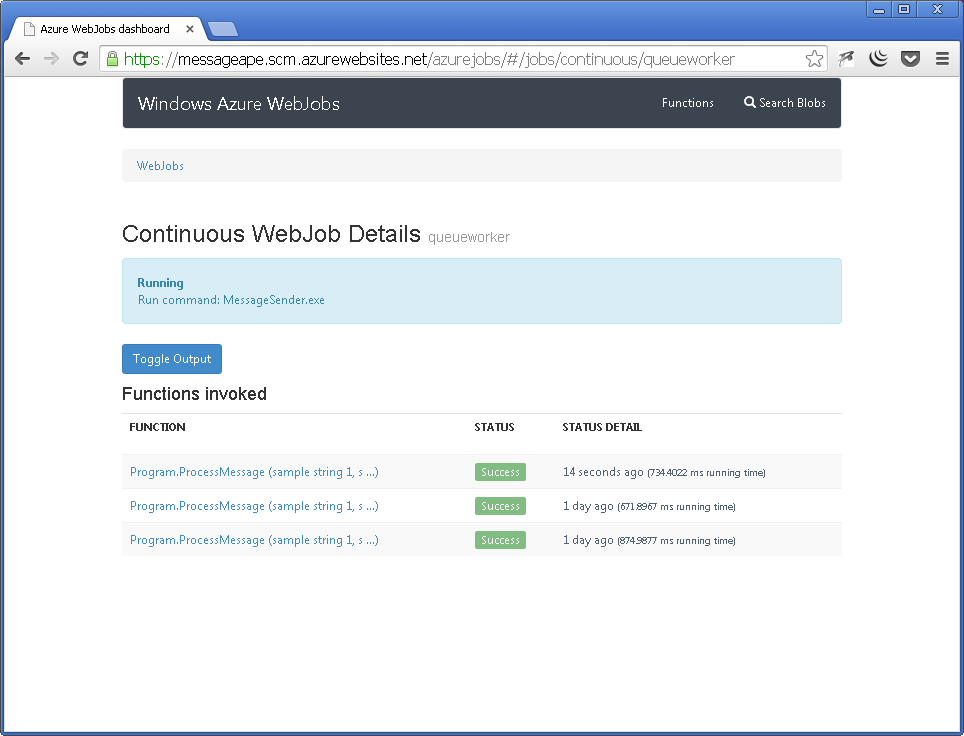
You can monitor your webjobs from the Kudu interface at: https://.
Here’s how my webjob dashboard looks after a few messages have been recieved.
I have uploaded my project to https://github.com/sjkp/MessageAPE if you want to see the complete source code: (Note this code is not updated to 0.3.0-beta version of the assemblies).