Are you are lead developer or in some other way responsible for more than just your own code? Do you find yourself creating the same code structures so often that you start to see repeating patterns? Then maybe it is time to look into Visual Studio Extensions to help improve your development speed. In this article I will describe how easy it is to create a simple item template that you can use again and again on all your projects from the new item dialog in Visual Studio.
In my dayjob as a SharePoint Consultant, we use a framework created by some of my collegeaues when we create our SharePoint solutions. This is to help ensure that our solutions use the same coding patterns to improve maintainability, and to ensure as much code reuse as possible between projects. Our framework uses the Model-View-Presenter pattern for e.g. webparts, webcontrols and usercontrols, and we use Unity as our dependency container framework. One downside of our framework is that it requires creating a few extra files compared to a standard webpart created with Visual Studio’s built-in item template for SharePoint webparts. When you create many webparts it gets kinda tidious having to create these boilerplates files for our framework to work, that is why I was set out to create our own webpart item template for Visual Studio.
I had no previous experience in creating any form of extentions for Visual Studio, but after having tried it, I must say, it has for most parts been a very pleasent and easy experience. For those reasons I really encourage more people to look into it especially if you fall in any of the categories I mentioned in the beginning.
The process I ended up using was:
- Download and install the Visual Studio SDK, it will give you some new Project Templates
- Create a project where you create the code you want to transform into an item template, one last time, in my case I created a webpart with our framework including all the required file, compiled the code and made sure it worked.
- Once you have the code ready it is time to parameterize it, thus removing all unwanted namespaces, class names etc.
- Once all files have been parameterized (in my case *.cs, *.webpart, *.xml, *.spdata) then it is time to export the template. I used the “File > Export Template” option in Visual Studio then I selected “Item Template” and on the “Select Item To Export”, I selected the most important file (because the dialog only supports exporting one file to an item template), in the “Select Item References” i just selected the most important references in my case my framework dll and sharepoint dll. On the Select Template Options page I gave my template a name and description and left the Automatically import the template into visual studio unchecked.
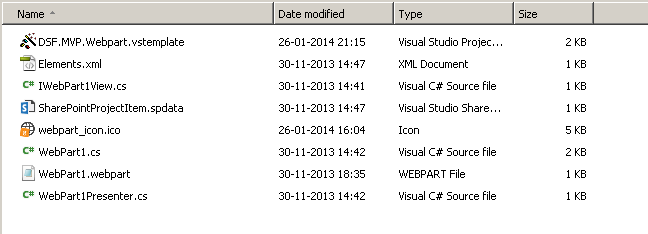
- Now you will be taken to the “My Exported Templates Directory” where a zip can be found containing your item template. If you item template like mine was supposed to contain more than one template file, then you are not done yet. You have to unzip the file and add the remaining files. Here is how my directory looked after the remaining files has been added.
- After the files have been added the *.vstemplate must all so be edited to contain references to all files here’s how mine looked after adding all the ProjectItem elements (one ProjectItem per file) as you can see it’s again possible to use the template tokens from earlier.
-
[xml]
<VSTemplate Version="2.0.0" Type="Item" xmlns="http://schemas.microsoft.com/developer/vstemplate/2005" xmlns:sdk="http://schemas.microsoft.com/developer/vstemplate-sdkextension/2010">
<TemplateData>
<DefaultName>WebPart</DefaultName>
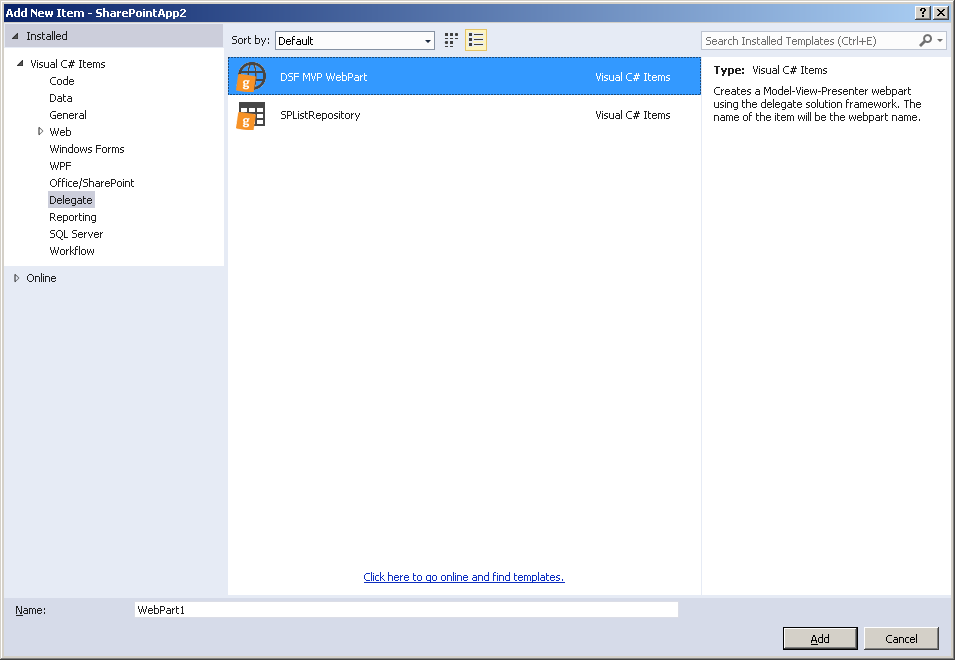
<Name>DSF MVP WebPart</Name>
<Description>Creates a Model-View-Presenter webpart using the delegate solution framework. The name of the item will be the webpart name. </Description>
<ProjectType>CSharp</ProjectType>
<ProjectSubType></ProjectSubType>
<SortOrder>10</SortOrder>
<Icon>webpart_icon.ico</Icon>
<TemplateGroupID>SharePointItemTemplateGroupID</TemplateGroupID>
<NumberOfParentCategoriesToRollUp>1</NumberOfParentCategoriesToRollUp>
</TemplateData>
<TemplateContent>
<References>
<Reference>
<Assembly>Microsoft.SharePoint</Assembly>
</Reference>
<Reference>
<Assembly>Delegate.Sharepoint</Assembly>
</Reference>
<Reference>
<Assembly>System.Web</Assembly>
</Reference>
</References>
<ProjectItem SubType="Code" TargetFileName="$fileinputname$\$fileinputname$.cs" ReplaceParameters="true">WebPart1.cs</ProjectItem>
<ProjectItem SubType="" TargetFileName="$fileinputname$\Elements.xml" ReplaceParameters="true">Elements.xml</ProjectItem>
<ProjectItem SubType="Code" TargetFileName="$fileinputname$\I$fileinputname$View.cs" ReplaceParameters="true">IWebPart1View.cs</ProjectItem>
<ProjectItem SubType="" TargetFileName="$fileinputname$\$fileinputname$.webpart" ReplaceParameters="true">WebPart1.webpart</ProjectItem>
<ProjectItem SubType="" TargetFileName="$fileinputname$\SharePointProjectItem.spdata" ReplaceParameters="true">SharePointProjectItem.spdata</ProjectItem>
<ProjectItem SubType="" TargetFileName="$fileinputname$\$fileinputname$Presenter.cs" ReplaceParameters="true">WebPart1Presenter.cs</ProjectItem>
</TemplateContent>
</VSTemplate>
[/xml] - Once this manual editing has been completed it’s time to zip up the files (the files must be located in the root of the zip archive), once the files have been zipped the item template can be installed into visual studio by placing the zip file in “C:\Users\[USERNAME]\Documents\Visual Studio 2013\Templates\ItemTemplates”, if you place your zip in one of the sub folders it will only show up in that category inside visual studio, it’s also possible to add your own subfolders to e.g. Visual C# if you want your template to show up in e.g. a special named sub category.
- When the zip has been placed restart Visual Studio and test that your item template works as desired, unless you are very lucky expect to go back and forth between unzipping and editing and zipping and trying again in VS a few times until you get it 100 % correct.
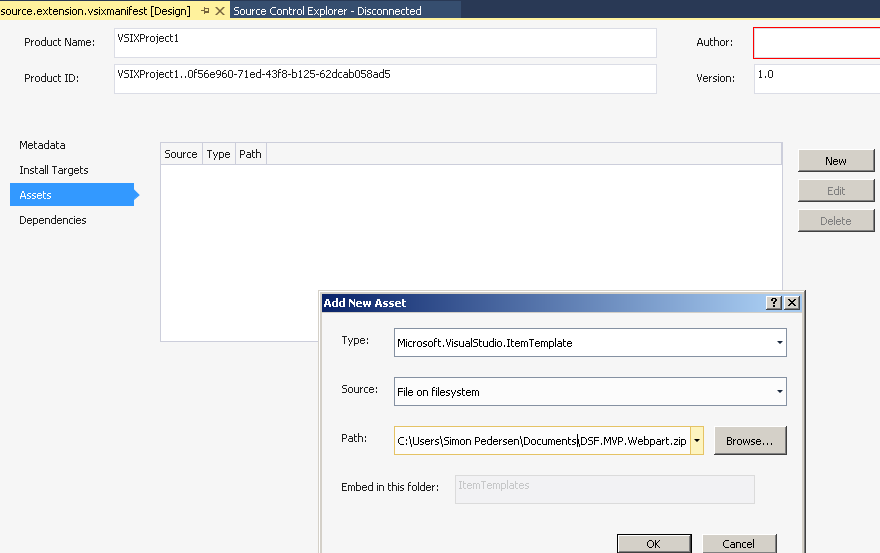
- When you are happy with your item template you can wrap it up in a VSIX package, which makes installing it as simple as double clicking the VSIX file. (A VSIX file is just another zip with some xml files)
- The easiest way to create the VSIX package is to create a new visual studio project from the VSIX project template. In the vsixmanifest designer you can easily add your item template in the Assets dialog and point to your zip file.
- Then when you build the VSIX project, it will generate a nice VSIX package that you can distribute yourself or upload to the Visual Studio Solution Gallery if you want to distribute online.
In the case of my webpart file the parameterized version of the code looks like:
[c]
using DG.SharePoint;
using DG.SharePoint.WebParts;
using DG.SharePoint.WebParts.Logic;
using System;
using System.ComponentModel;
using System.Web;
using System.Web.UI;
using System.Web.UI.WebControls;
using System.Web.UI.WebControls.WebParts;
using Microsoft.SharePoint;
using Microsoft.SharePoint.WebControls;
namespace $rootnamespace$.$fileinputname$
{
/// <summary>
/// TODO
/// </summary>
[ToolboxItemAttribute(false)]
public class $fileinputname$ : WebPartBase<I$fileinputname$View,IPresenter<I$fileinputname$View>>, I$fileinputname$View
{
protected override void CreateChildControls()
{
}
protected override void OnPreRender(EventArgs e)
{
if (HasError)
{
Controls.Add(ErrorAsControl);
return;
}
base.OnPreRender(e);
}
protected override I$fileinputname$View View
{
get { return this; }
}
}
}
[/c]
As you can see the code has a lot of $fileinputname$ and other tokens, these will be replaced by Visual Studio once an item from the item templates gets created. For a complete list of available tokens check msdn.
That is it, now you created your first item template for visual studio, or at least your have got all the steps required to do so. Once you get more adventurous, you can start adding more items templates to the same VSIX, like I did, but then you might run into the Invalid Multiple ZIP Files in VSIX error when you try to upload it to the Visual Studio Solution Gallery.
Andreas Kuntner has on his blog explained how to fix this issue, I haved copy pasted his explanation, since he is working with a ProjectTemplate you have to replace it that with ItemTemplate:
If your installer contains multiple project templates, chances are high that you are presented the error message “Invalid Multiple ZIP Files in in VSIX” in the second part of the Visual Studio Gallery upload process. The Visual Studio Gallery uploader seems to be quite buggy, i was struggling with this exact error forever… Here is a workaround that worked at least for me:
Rename the *.vsix file to *.zip, extract its contents to some empty folder, and open the ProjectTemplates folder. It seems that for Visual Studio Gallery to accept your installer, each category-folder (see step 7) may only contain one single ZIP file. This means that you could either ensure that each category contains only one of your project templates, but this might be too limiting in most cases. The alternative is to rename to ProjectTemplates folder, for example to ProjectTemplates1, and duplicate it to additional folders ProjectTemplates2, ProjectTemplates3, an so on. Now you can remove all the ZIP files except for one from each of the folders.
Moreover, it seems that the uploader doesn’t like similar folder names – e.g., if you have one folder called ProjectTemplates1 you should not create another one called ProjectTemplates10, since this contains the name of an existing folder. If 9 different project template folders are not enough, consider naming the folders ProjectTemplatesA, ProjectTemplatesB, and so on!
For this to work you’ll also need to adapt the extension.vsixmanifest file: Inside the
line for each project template folder you have created.
Finally, create a ZIP file again, rename it to *.vsix and try to upload it again!
Here’s a final screenshot of how my two item templates look in Visual Studio, quite pleased with the result.