When building Office Outlook Addins there has traditionally been three ways to install them.
- Installation from the Office Store
- Installation by a Exchange administrator uploading the manifest.xml
- Installation by a end-user by uploading the manifest.xml
Recently Office 365 was also extended with the centralized deployment feature that allows tenant admins to roll out Office addins to organizational users (or subset of users). But for now the feature only works with Excel, Word and PowerPoint addins (no support for outlook yet).
In my opinion we can make an even more seamless user on-boarding experience. If you have a product page promoting your addin, wouldn’t it be nice if you could click a single button on the page that would install the addin on behalf of the user? Microsoft have done this with their Outlook addin FindTime.
For a while I was wondering how this was done, and I tried to look for documentation but wasn’t able to find any. Recently the need came up again, and I had some time to do some more digging into how it can be done, and was able to come up with a solution that I will share with you.
I considered, creating a general purpose solution for people to use, but decided against it, as I believe only a few people will actually have the need. If you want me to build a solution and you are willing to pay a little for it please let me know in the comments below, and I would love to do it. Until then, I will just share how it technically can be accomplished.
The API that supports installing Outlook addins are part of the Exchange Web Service (EWS) API. The EWS API is very large, and generally allows you to do anything in regards to Exchange. The way I was able to find out that the EWS API could be used, was by attaching Fiddler to Visual Studio and doing a debug deployment of an addin while developing. This way you are able to see the network traffic and can see exactly which APIs Visual Studio calls in order to install the Addin before the debug session begins.
For working with Addins the Exchange Web Service API have the following interesting operations.
|
Operation name |
Introduced in |
|---|---|
|
Exchange 2013 |
|
|
Exchange 2013 |
|
|
Exchange 2013 |
|
|
Exchange 2013 |
|
|
Exchange 2013 |
|
|
Exchange 2013 |
The one we need in order to install an addin is as you have probably guess, InstallApp.
Let’s see how we can use that to install an Outlook Addin on behalf of a users.
The great thing about the EWS API is that we can authenticate with it in many ways, it supports basic authentication, but it also supports OAuth2 using Azure AD. Thus if we can sign the users in using Azure AD, we can request an Access token that can be used to make calls to the EWS API as the logged in user.
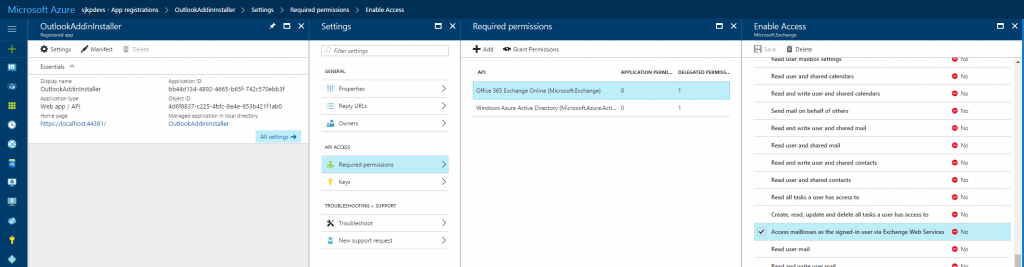
If you are familiar with using Azure AD for authentication in custom applications, you should know that you need an Azure AD Application registered. This application with determine which permissions the application request the user to give consent to. For working with the EWS we need the following permissions
- Office 365 Exchange Online (Microsoft.Exchange) – Access mailboxes as the signed-in user via Exchange Web Services
- Windows Azure Active Directory – Sign in and read user profile
It looks like the following in the new Azure portal.
Once you have the application registered, you need to get an access token for the user once they click you “Install Addin” button. Getting the access token for the EWS API is not any different from getting an Access token for any other service that is integrated with Azure AD.
If you are not familiar with how to setup an MVC web application with Azure AD authentication, then this sample is a good starting point https://azure.microsoft.com/en-us/resources/samples/active-directory-dotnet-webapp-openidconnect/.
To get an access token that works with EWS we need to alter the Startup.Auth.cs ConfigureAuth method slightly, mine looks like this:
[csharp]
public void ConfigureAuth(IAppBuilder app)
{
app.SetDefaultSignInAsAuthenticationType(CookieAuthenticationDefaults.AuthenticationType);
app.UseCookieAuthentication(new CookieAuthenticationOptions());
app.UseOpenIdConnectAuthentication(
new OpenIdConnectAuthenticationOptions
{
ClientId = ClientId,
Authority = Authority,
Notifications = new OpenIdConnectAuthenticationNotifications()
{
// If there is a code in the OpenID Connect response, redeem it for an access token and refresh token, and store those away.
AuthorizationCodeReceived = (context) =>
{
var code = context.Code;
ClientCredential credential = new ClientCredential(ClientId, AppKey);
String signInUserId = context.AuthenticationTicket.Identity.FindFirst(ClaimTypes.NameIdentifier).Value;
AuthenticationContext authContext = new AuthenticationContext(Authority);
AuthenticationResult result = authContext.AcquireTokenByAuthorizationCodeAsync(code, new Uri(HttpContext.Current.Request.Url.GetLeftPart(UriPartial.Path)), credential, SettingsHelper.EwsResourceId).GetAwaiter().GetResult();
return Task.FromResult(0);
},
RedirectToIdentityProvider = (context) =>
{
// This ensures that the address used for sign in and sign out is picked up dynamically from the request
// this allows you to deploy your app (to Azure Web Sites, for example)without having to change settings
// Remember that the base URL of the address used here must be provisioned in Azure AD beforehand.
string appBaseUrl = context.Request.Scheme + "://" + context.Request.Host + context.Request.PathBase;
context.ProtocolMessage.RedirectUri = appBaseUrl + context.Request.Path;
context.ProtocolMessage.PostLogoutRedirectUri = appBaseUrl;
return Task.FromResult(0);
},
AuthenticationFailed = (context) =>
{
// Suppress the exception if you don’t want to see the error
context.HandleResponse();
return Task.FromResult(0);
}
},
TokenValidationParameters = new System.IdentityModel.Tokens.TokenValidationParameters()
{
ValidateIssuer = false
}
});
}
[/csharp]
The key ingredience here is
[csharp]
AuthorizationCodeReceived = (context) =>
{
var code = context.Code;
ClientCredential credential = new ClientCredential(ClientId, AppKey);
String signInUserId = context.AuthenticationTicket.Identity.FindFirst(ClaimTypes.NameIdentifier).Value;
AuthenticationContext authContext = new AuthenticationContext(Authority);
AuthenticationResult result = authContext.AcquireTokenByAuthorizationCodeAsync(code, new Uri(HttpContext.Current.Request.Url.GetLeftPart(UriPartial.Path)), credential, SettingsHelper.EwsResourceId).GetAwaiter().GetResult();
return Task.FromResult(0);
},
[/csharp]
In these lines we request an access token for EWS using its resource id, which is https://outlook.office365.com. It is very important to use this specific Uri as the resourceId even though the EWS resource in Azure AD is also identified with the GUID 00000002-0000-0ff1-ce00-000000000000, but if you use the GUID when requesting the access token you will get an access token, that EWS won’t accept.
Once we have an EWS access token we can use the Microsoft Exchange WebServices nuget to easily call the EWS API to install the addin. In my MVC application I created an separate action that requires the user to be authentication and then install an Outlook manifest.xml for the logged in user.
My manifest is located in App_Data and named OutlookAddinManifest.xml.
It looks like
[csharp]
[Authorize]
public async Task<ActionResult> Install()
{
var signInUserId = ClaimsPrincipal.Current.FindFirst(ClaimTypes.NameIdentifier).Value;
var userObjectId = ClaimsPrincipal.Current.FindFirst("http://schemas.microsoft.com/identity/claims/objectidentifier").Value;
AuthenticationContext authContext = new AuthenticationContext(SettingsHelper.Authority);
var accessToken = string.Empty;
try
{
var authResult = await authContext.AcquireTokenSilentAsync(SettingsHelper.EwsResourceId, new ClientCredential(SettingsHelper.ClientId, SettingsHelper.AppKey), new UserIdentifier(userObjectId, UserIdentifierType.UniqueId));
accessToken = authResult.AccessToken;
} catch(AdalException ex)
{
return RedirectToAction("SignIn", "Account");
}
ExchangeService service = new ExchangeService(ExchangeVersion.Exchange2013_SP1);
service.HttpHeaders.Add("Authorization", "Bearer " + accessToken);
service.TraceEnabled = true;
service.TraceFlags = TraceFlags.All;
service.Url = new Uri("https://outlook.office365.com/EWS/Exchange.asmx");
try
{
var apps = service.GetAppManifests();
using (var fs = System.IO.File.OpenRead(Path.Combine(HostingEnvironment.MapPath("~/App_Data"), "OutlookAddinManifest.xml")))
{
service.InstallApp(fs);
}
}
catch (Exception e)
{
var i = e.InnerException as WebException;
if (i != null)
{
var r = new StreamReader(i.Response.GetResponseStream()).ReadToEnd();
}
throw;
}
return View();
}
[/csharp]
Now all you need to do is to link to your install action, and it will take care of installing the addin for the user. Of course the user have to give consent in order for your web application to be allowed to access Exchange Web Service on their behalf. Once the addin is installed, the user have to close/reopen Outlook desktop or do a full refresh if they are using the Outlook Web Access before the addin is available.
If you want to see a my solution you can find it in github at https://github.com/sjkp/outlook-addin-installer/tree/master/OutlookAddinInstaller.